
When I was about 10 years old, my father set up a goldfish aquarium for my grandmother after her doctor recommended an aquarium for her high blood pressure. My grandmother and I sat on her sofa and watched the fish swim around the skeleton figure protecting the pirate treasure chest in the aquarium. Soon after I asked my father for my very own fish aquarium, and he brought home a goldfish in a bowl. From then on, I was fascinated by fish and aquariums.
Many years later, I became aware that no matter how good plastic plants looked, they could not replace the natural beauty of live plants. Fish would display their natural vibrant colors and behaviors a lot more when kept in a planted tank. Searching online for more information on aquatic plants, I came across SCAPE (Southern California Aquatic Plant Enthusiasts), and joined the club. SCAPE helped me a lot by saving me time, money and frustration, which would have steered me away from planted aquariums.
I currently have four nano plant tanks that are no larger than 5 gallons, as well as a 9-gallon aquarium. What fascinates me about nano aquariums is the ability to set up and re-scape these tiny aquariums without much hassle. This is important when trying to improve one’s aquascaping skill. I find that the more you redo an aquarium, the better you become at aquascaping.
This hobby has allowed me to have a part-time business of setting up aquariums and maintaining them in public areas as well as private homes. It’s always a challenge to set up an aquarium and design it according to the client’s needs. I hardly consider it a second job, however, because I enjoy it so much.
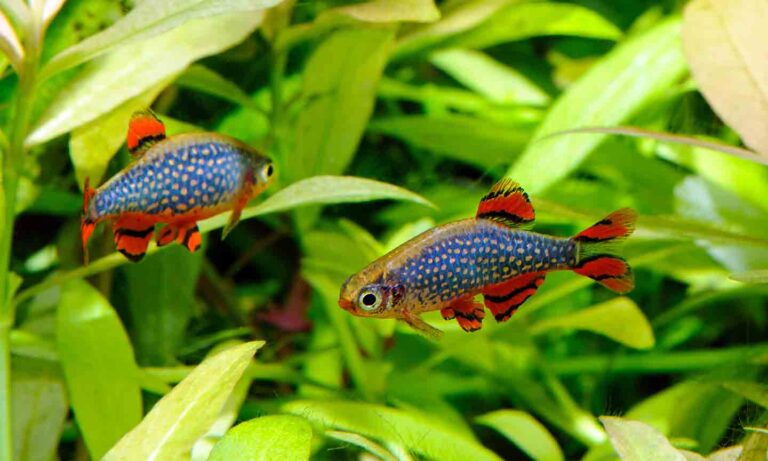
The Fish That Started It All: The Celestial Pearl Danio
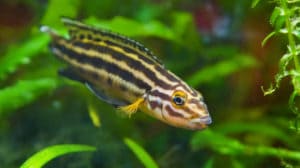
Back in 2007 a small fish by the trade name of galaxy rasbora AKA celestial pearl danio (CPD), Danio margaritatus, arrived at local fish stores. This nano fish measured 1.5 centimeters at full adult length. Up to this point, the smallest fish I ever kept were guppies and tetras. I was caught up in the craze and managed to locate a few specimens, which I paid a substantial amount of money for at the time. Back then, my planted aquarium was a 120-gallon discus aquarium.
With nowhere else to place my acquired D. margaritatus, I acclimated them to my discus tank. They thrived with the discus, and their color and pattern mesmerized me. Then I concluded that they were worthy of having their own environment for themselves. That’s when my affection for planted nano aquariums began.
There is more than one way to set up a planted nano tank. This is what I have found in my 20 years of being in the hobby. A nano aquarium is generally an aquarium that is 10 gallons or less. Most of the rules and equipment for setting up a larger aquarium apply to a nano aquarium. Some of the vital equipment required is substrate, light and CO2 (depending on plants chosen).
Before you purchase an aquarium, decide what you plan to achieve with the nano tank. Will it be a display tank where it will get a lot of attention? Do you just want to grow plants for their simple beauty and challenge? Will it be a plant or shrimp farm? Will it serve as a grow-out tank for your bigger aquarium? Once the decision is made, then proceed to purchase the nano aquarium.
Setting Up A Planted Nano Tank
Fortunately, planted aquariums have become a large percentage of the hobby. Manufacturers have recognized the interest in ornamental nano shrimp and live plants and have developed kits that get people started with little effort. Long gone are the high costs of setting up a planted aquarium with expensive CO2 systems and equipment.
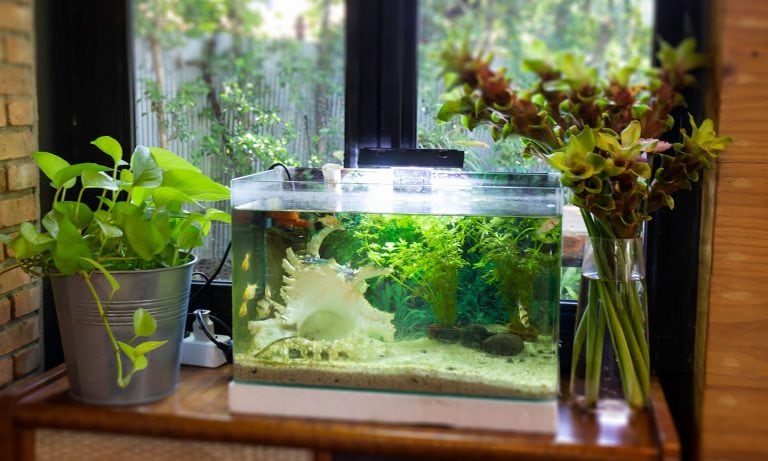
The aquarium I chose was a 9-gallon, rimless cube that was an all-in-one kit designed for nano shrimp and plants. It is an affordable kit that got me started with the essentials for less than $100. I planned to use it as a display tank that highlights the beauty of the flora and fauna equally. I used medium to high lighting (more than 2 watts per gallon) to allow for a foreground of Hemianthus callitrichoides Cuba, downoi (Pogostemon helferi) and Japanese hair grass (Eleocharis belem) and crypt parva (Cryptocoryne parva).
An additional 13-watt light fixture was purchased to provide ample light to reach the foreground plants. My 9-gallon example tank had a total of 26 watts of full-spectrum, 7000 Kelvin light. Stones were also boiled. I used tweezers for making adjustments in the tight corners of this small tank.
Along with the aquarium kit, the other equipment necessary for the aquarium was additional substrate. Substrate is essential to a successful planted aquarium. Many options are on the market, even the affordable organic soil capped off with fine natural gravel method.
Getting The Substrate Right
I strongly suggest that you purchase the best substrate available. Generally, a good substrate should be composed of soil rich in minerals like iron and carbon. It should also have the capability of softening the water and lowering the pH, because most plants do better in soft water with low pH. Plants such as crypts and those of the Eriocaulon genus prefer this environment.
For a nano tank it is recommended to use a substrate than has a finer grain. This will be proportional to the aquarium’s size. Finer-grain substrate has a higher cost, so you can just add a top layer of finer-grained substrate to the finished layout before adding water. Many people use pumice, lava rock or even sintered clay balls, used in the hydroponic hobby, as a bottom layer to help the substrate maintain a well-oxygenated environment and prevent an anaerobic substrate.
In my 9-gallon tank, the substrate was not so deep so it was not necessary to add a bottom layer. About 4 liters were used to create a steep slope.
A nano aquarium has a small footprint, which makes buying quality substrate more affordable. In this case, the substrate was included with the kit, but a small additional bag was purchased to completely cover the bottom of the aquarium.
Assembling The Scape
Following the general rules of aquascaping, the substrate was sloped gradually to add depth to the scape. The driftwood chosen was a tall, branchy piece that resembled a tree trunk. If the right size wood cannot be found, find one larger piece and cut it to size instead of using small pieces and trying to combine them for a larger effect. The driftwood we used was boiled and allowed to become waterlogged for three weeks in another aquarium.
Besides wood, stone can be used as a centerpiece to anchor the whole look of the scape. Like the driftwood, stones were also boiled.
If you don’t use wood or stone for your centerpiece, a large plant can create the same effect, but select a plant that is brighter and larger than the others. It’s more difficult to do a natural scape without any hardscape. One plant type that can be used as a centerpiece or anchor to your scape is a large group of bright red plants, or ones with a different texture such as red ludwigia (Ludwigia repens) or downoi (Pogostemon helferi).
Another centerpiece option is a small clay pot or small container suitable for aquarium use that can be covered in moss to achieve a look of having been at the bottom of a river or pool for a long time.
The 9-gallon nano tank was tall, so the wood chosen had to be at least two-thirds the height of the aquarium height, in order to keep it in proportion to the aquarium. If using stone instead of wood, follow the same guideline and have the largest stone be two-thirds the height of the aquarium.
Light-colored stones with rough texture will ground the driftwood and transition the wood to the substrate. Carefully select plants that are small when fully grown. Avoid larger plants like Amazon swords and broad-leaf plants, such as water sprite.
I wanted tall grassy and stem plants in the background, so Cryptocoryne spiralis and Rotala sp. green were chosen. Medium-height plants were placed in midground. Cryptocoryne wendtii bronze was chosen for its average size of 5 inches and its rich dark bronze color and rough texture. The Cryptocoryne wendtii was the focal point of the aquarium and was placed off center to draw the eye toward it. Dwarf clover (Hydrocotyle sp.) was planted surrounding the C. wendtii to brighten and soften the midground.
A Bolbitis heudelotii fern was attached to the driftwood with a rubber band, which was removed once the fern attached to the wood. Bolbitis is considered a medium to large plant. With diligent trimming, the Bolbitis can remain small and proportional to the driftwood and the nano tank itself. Finally the foreground was a mixture of Hemianthus callitrichoides, Eleocharis belem, downoi and Cryptocoryne parva.
Choosing Friendly Fauna
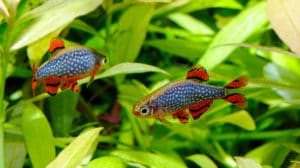
Fauna chosen was a school of seven ember tetras (Hyphessobrycon amandae) and cherry shrimp (Neocaridina heteropoda var. red). Both these species are compatible and stay small in adulthood. Some fish are territorial and given the small space, a single school of fish will look and do best in a nano aquarium.
Equipment and Rules
Some other equipment to consider that will make your set up easier are: long tweezers for planting stem plants and arranging the hardscape; scissors; cotton thread or nylon thread if attaching moss or Anubias to wood and stone. Rubber bands and instant glue to attach ferns to wood and stone.
Additionally, follow these general rules for your nano tank.
1. Keep the bioload low with a dense amount of foliage. This allows for low maintenance and less water changes preventing large fluctuations in water chemistry, which could cause an algae outbreak or stress to the fauna.
2. Feed sparingly, because there is usually no large canister filter in a nano or pico (tanks smaller than nano). Some pico tanks have successfully been kept with no lights and filter other than ambient light and water changes.
3. Choose the hardscape with the most texture. Wood and stone that is smooth in texture will not make the aquarium look natural. Select wood and stone with a lot of texture and character to make your aquarium more natural looking.
SCAPE Club
Having been in the hobby for more than 20 years, I have owned most types of aquarium setups, but freshwater, live-planted aquariums are still my favorite type. Now all my aquariums are planted tanks. The cool green color shades and textures are what attract me most to aquatic plants. My local club now happens to be the largest local aquatic plant club in the nation, Southern California Aquatic Plant Enthusiasts (SCAPE). Soon after I joined, I was elected as a board member.
Through SCAPE, I was introduced to all the types of planted tank setups (scapes): low-tech natural, high-tech, Dutch, nature style as pioneered by Takashi Amano and many others. I have no favorite — I enjoy them all. I continue to learn and find interest in planted aquariums. To this day I still keep a nano tank with celestial pearl danios.
SCAPE is a local club with an online forum, chat room, and monthly meetings. SCAPE’s mission is to be a family-oriented club dedicated to bringing awareness of aquatic plant aquariums. For more information on SCAPE, visit www.scapeclub.org.
Planted Tank Lighting Tips
Unless you are making your own nano tank, most kits on the market today have a nice lighting system designed just for that particular nano tank. Some are very underpowered, so do a bit of research and check out the lighting that comes with the kit before you buy it. You might be able to upgrade it, but sometimes it is a proprietary light fixture that is difficult to replace, and it is much easier to move on to another system than buy an underpowered system and try to convert it.
Be sure to buy a system specially designed for plants, not for corals, as each has a different lighting spectrum and light intensity requirements. If you are designing your own, myriad light fixtures are available. A trip to a big box hardware store will provide you with an almost overwhelming array of choices. Many do-it-yourselfers use desk lamps, and these can work fine if you have the right spectrum bulbs. You can use small fluorescent bulbs, compact fluorescent (CFL) screwed into an incandescent lamp socket, power compacts (PC), or even LED lighting, as long as you make sure it is designed for plant growth. If this description does not fit you, go to the pet store and buy a ready-made kit. You’ll be much happier in the long run.
Just as with a regular tank, make sure your lighting is only on for 10 to 12 hours a day. This is probably the single, biggest mistake I’ve seen with lighting on nano planted tanks — folks don’t bother to use a timer and just turn it on and off when they remember to do so. Plants need 10 to 12 hours of light each day, on a regular schedule. –Mike Hellweg
Carbon Dioxide Tips
Plants need carbon dioxide for proper growth. Articles abound on equipment designed for adding CO2 to a large tank, but the recent interest in nano planted tanks has left many of us wondering how to scale this down. Fortunately a couple of manufacturers have come up with nano-tank-sized devices that are fairly easy to use.
One is powered by a CO2 canister designed for a paintball gun. This is a fairly simple device to use, but buying CO2 canisters can become expensive. A couple of others are variations on the homemade yeast reactor. And yet others are simply scaled-down versions of diffusers for larger tanks.
For my nano plant tank I’ve found the simplest and easiest to use for me is one of the small commercial yeast reactors. It comes with premeasured packets of yeast and baking soda, and all you add is sugar. It has a ladder-like device that enables the CO2 to bubble in slowly and dissolve as it moves up the ladder. I’ve found these to be almost foolproof, but the ladder device is large and a bit hard to hide in a small tank. Buy a second reactor tank and start the sugar/yeast mixture a couple of days before you hook it up to the tank, and you’ll always have CO2. These are inexpensive and easy to use, but don’t allow you to precisely control the addition of CO2.
There are also micro-sized canisters with valves that allow you to dose precisely, but these are incredibly expensive for their size.
All of the systems out there work, you just have to decide which one will be easiest for you to use and then maintain it regularly. –Mike Hellweg
Maintaining The Planted Tank
Nano tanks are susceptible to fast fluctuations in water chemistry. Having a small bioload allows less maintenance and makes for a more stable environment. Lighting was controlled with a timer with a light cycle of eight hours. The CO2 system was a regulator adapted to a 20-ounce paintball cylinder. The CO2 rate was 1 bubble per second through a ceramic diffuser while the lights were on.
The aquarium was fully planted from Day 1 and allowed to cycle for three weeks before adding any fauna. Potential for an algae bloom was reduced by starting with a 5-hour photoperiod and having a large amount of plant mass at initial planting. Black brush algae began to develop on the Bolbitis and brown dust algae on the stones. The black brush algae was trimmed off and treated with spot treatments of hydrogen peroxide. The green algae were consumed by the cherry shrimp, once added to the nano.
The result is a fully planted display tank that is aesthetically pleasing and remains challenging enough to keep my interest in its care. Maintenance includes a quick scraping of algae from the glass surfaces and weekly 20 percent reverse osmosis water and 10 percent treated tap water changes. Trimming is done every two weeks along with the maintenance of the filter and other equipment or as needed. A 9-gallon cube has a small footprint and can be placed in any area of the home or even on a desk at work, and moved if necessary.
Victor Merida Jr. is a native of Southern California and works in the medical field. He does not have hobbies, instead, he has passions — for aquariums, old cars and old vinyl records.
Featured Image: Via iStock.com/corridor91
Share: