Imagine living in a palatial suite where all your needs are fulfilled by a pampering staff. The attentive housekeeping crew makes sure no stone remains unturned in their quest for impeccable cleanliness, and the utilities supervisor deftly maintains your suite temperature precisely within your comfort zone.
However, this utopian environment is plagued with absolutely dismal room service. While meals are delivered in colorful vessels replete with seemingly delectable ingredients, the cuisine is always the same dry material fortified with vitamins and artificial colors. The food is quite healthy, but it lacks freshness.
Keep it Fresh
The intent of this article is not to demean the many excellent flake foods that are now available. Since the 1960s flake food manufacturers have done a commendable job in providing quality products at very reasonable prices. But think about it: Would you rather eat a bowl of cereal or a crisp garden salad? Few would choose to exclusively consume either, but served at different times of the day both are highly desirable. I wish to present reasonable options for complementing flake food diets.
These options can be custom tailored for species-specific needs, or simply developed based upon your available time and the level of effort you wish to devote to the project. The options are presented in three categories, from the smallest organisms to those of moderate size and culminating with larger fresh foods. An equipment list is included for propagating many of the live foods discussed. Two levels of effort are also included: 1) easy (low effort and easily obtainable results) and 2) intricate (time consuming, construction required and/or frequent attention to culture).
Small Foods
Nitrosomonas
These bacteria and other microorganisms are the tiniest of organisms. Oftentimes, fish can be seen picking at the roots of plants, rocks and various objects in the aquarium. They are devouring plants and animals that are usually seen only through a microscope.
Thankfully, betta vases have gone the way of the pet rock, but when they were the rage many of the fish housed in them survived solely on microorganisms. Evidence of microorganisms can be readily observed by simply floating a well-seasoned biowheel in an aquarium. Fish that feed on them are enjoying a fresh micromeal.
Equipment
Biowheel, live plant roots, sand and anything bacteria can grow on.
Level of effort
Easy. This is more like dessert rather than a main course, but your fish will sure have a feeding frenzy if you float a biowheel in their tank for a few minutes.
Infusoria
These are very small organisms that are ideal for feeding newly hatched egg-laying species. Most live-bearing species are able to take larger food at birth. They don’t need infusoria, but they will certainly enjoy it.
Equipment
Clean tank water, infusoria starter culture, 2-gallon aquarium, turkey baster and magnifying glass.
Level of effort
Intricate. Here is how it’s accomplished: I fill a 2-gallon aquarium with water from my turtle pond, which is replete with infusoria. Aquarium water will also work well, but aquarium fish eat most infusoria, so a starter culture might be necessary for those hobbyists who are in a hurry to get a colony established.
Add a few leaves of finely shredded lettuce and about a ½ cup of chopped hay. Maintain a water temperature of about 80 degrees Fahrenheit, and the water will soon become opaque. Be patient, and in about a week the water will clear.
Here are a couple of easy methods for testing the ripeness of your culture. First, try illuminating the back of the aquarium. Next, use a magnifying glass to look through the front glass for movement. Infusoria look like specks of pixie dust zooming around.
Another method to test for the ripeness of your infusoria culture is to draw a sample using an eyedropper, and examine the sample on a glass slide. There should be swarming activity when the culture is mature. Use an eyedropper or turkey baster to harvest your culture, and your baby fish will enjoy a delectable meal.
Daphnia
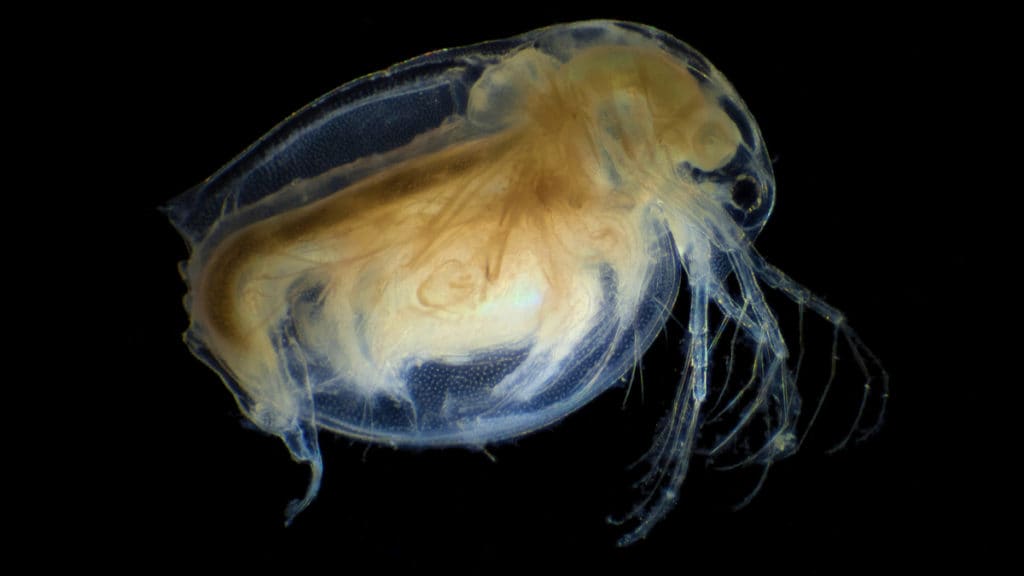
Also called water fleas, they are ideal for feeding small fish. These little crustaceans look like swirling specks near the shoreline of most ponds. They are easy to collect using a dipnet. The best location to collect them is in calm water near an algae bloom. I use a 3- by 3-inch dipnet to collect about 50 specimens. The collection is placed in a clear 1-quart plastic container, which allows for easy inspection to ensure other organisms aren’t inadvertently included.
These Daphnia are then cultivated in green water. Green water is basically a deliberate algae bloom. Daphnia and even some newborn fish eat the unicellular algae and other organisms found in green water. Creating green water and cultivating Daphnia is relatively simple.
Equipment
One 15-gallon plastic tub, pond or seasoned aquarium water, a dipnet, magnifying glass, lettuce, aquatic plant fertilizer, turkey baster and a small clear container.
Level of effort
Intricate. Set up a plastic 15-gallon tub where it will get bright light. You might have to experiment with several locations to determine the ideal amount of light required. I have my green water tub receiving direct sunlight until about noon. A nook against the foundation of a home is an ideal location to keep the water from overheating.
By the way, if you find a perfect location for your green water tub but it is in an area that receives too much direct sunlight, try decorative shading. Using aquatic plants to shadow your culture from being blasted by the sun during the height of summer creates a beautiful setting.
I fill a 15-gallon tub with water from my turtle pond and add small pieces of lettuce, a ½ teaspoon of yeast and turtle feces as a fertilizer. Depending on the amount of light and the outside temperature, green water develops in about a week. Late spring and summer are best for green water culturing because of the lengthy photoperiod. After your green water is well established, do partial 25 percent water changes just as you would for an aquarium. In some cases, gentle aeration might be necessary to prevent stagnation.
Here are a couple of tips about cultivating Daphnia. Avoid using chlorinated tap water because chlorine kills Daphnia. There are numerous recipes for feeding Daphnia, but I use about a ½ teaspoon of active yeast for 15 gallons of water each week. Use a turkey baster to harvest your culture. Cull your Daphnia culture if you have a population explosion and can’t use all of them. You will be a hero for sharing your yield with fellow aquarists.
Moderate-Sized Foods
Microworms
This is the generic name for several types of tiny worms about 1/10 of an inch in length. They are ideal for feeding small fish that have outgrown the need for smaller foods such as infusoria. They bridge the gap between infusoria and baby brine shrimp.
Equipment
Two cup-sized glass bowls with tight-fitting clear covers, a microworm culture, four bioballs, wheat germ and baker’s yeast.
Level of effort
Intricate. Take 1/4 cup of wheat germ and 1/8 teaspoon of baker’s yeast and mix with water into a paste. Put the paste into the glass bowl, add the culture and gently place three bioballs to form a triangle-shaped base.
Place the fourth bioball on top of the three to make a pyramid. The highest bioball will not touch the culture medium and remains clean. Cover the culture tightly. Keep the culture at about 80 to 84 degrees, and you should have a mass of worms in about one week. The worms will climb onto the bioballs.
You can simply toss the top worm-laden bioball into your aquarium. Microworms do not float or swim, but will quickly fall to the bottom and remain there. Raising and feeding baby fish in a bare-bottom tank is definitely an advantage when feeding them these worms since uneaten food is easily seen and removed.
I should mention that while I had success culturing microworms years ago, the smell made my family quite unhappy. The best bet is to keep multiple cultures going sequentially. After you harvest a culture, discard all but a small portion, which can be used to start a new culture. This will definitely keep offensive odors to a minimum.
Vinegar eels
These are another viable food. I have not cultured vinegar eels, but have read they are an excellent choice for feeding small fish for these reasons: they are truly aquatic, can survive for days in an aquarium and are easily cultured. Vinegar eels can also fill the gap between infusoria and baby brine shrimp.
Brine shrimp
Newly hatched brine shrimp are considered by many to be the perfect supplement food for all but the smallest of fish. Just like all foods, brine shrimp should be a component of a well-balanced diet. They are about the size of the 14-point type period enclosed between these parentheses (.).
Equipment
A 2-liter plastic soda bottle, an air pump, a rigid and flexible airline hose, one anti-siphon device, an aquarium sealer, two unused power filter siphons, a submersible heater, an airstone, an artificial light, a source of heat and some brine shrimp egg mix.
Level of effort
Intricate. Hatching brine shrimp is not difficult and offers a very high return for minimal effort. I made my hatchery from a plastic 2-liter seltzer water bottle connected to an air pump. Make sure to use an anti-siphon device on your airline hose to avoid accidentally draining your culture during a power outage. Seltzer water was chosen because the bottle does not need repeated rinsing to remove sticky soda pop. I used old power-filter siphons to suspend my hatcheries because coat hanger wire tends to corrode.
Use aquarium sealer to position the bottles and a couple of rubber bands to add additional support, if desired. Follow the directions on the brine shrimp egg package for hatching. I found keeping the temperature at about 85 degrees expedites hatching and produces a maximum yield.
To maintain the ideal temperature and maximize your yield, try suspending the soda bottle inside a bare-bottom, heated 18-gallon tall aquarium. An airstone in the tank will circulate the heating water. Using an 18-gallon tank is really neat because there is room of several hatcheries. If they are started a few days apart, the system produces a continuous flow of newly hatched brine shrimp. Position a bright light next to your hatchery during the hatching period. Fish gorge on newly hatched brine shrimp.
Fruit flies
These are the small gnat-like bugs that are sometimes seen hovering near bananas and other fruit. They come in either flightless or wingless varieties. Other than the aquatic community, they are considered a nuisance, but to juvenile and adult fish they are candy.
Equipment
A 1-gallon glass jar with tight-fitting cheese-cloth lid, starter culture, dehydrated flaked potatoes, sugar, banana, baker’s yeast and a battery-operated vacuum.
Level of effort
Intricate. Mix the food ingredients into a puree and place them into the bottom of the jar. Add the fruit fly culture and keep the jar at a temperature of about 80 degrees. The fruit flies will begin hatching in about two to three weeks.
I recommend starting several cultures at weekly intervals to maintain a constant supply of flies. Simply shake the flies into your tank. If you keep your wingless cultures going for an extended period, it is possible that some of the offspring will have the capability of flight. One trick is to open your container outside and allow the ones with wings to take off. I use a small battery-operated vacuum to trap those flies that escape either by flight or crawling out of the tank.
Large Foods
Mosquito larvae
These are another potential food source. The old saying, “Build it and they will come,” absolutely applies to mosquitoes.
Equipment
A 1-quart rectangular container, dirty or stagnant water, a dipnet or eyedropper.
Level of effort
Easy. Simply set the container of water out in a shaded spot and prepare to harvest mosquitoes. Mosquitoes love dirty and stagnant water because it contains nutrients that clean water typically lacks. I like placing the container near the ground especially next to a pond.
Mosquito larvae look like small wiggling organisms at the water’s surface. To capture the larvae pour the contents of the container through a dipnet, wash them, feed your fish and restart the process with new water. Use an eyedropper if you only need a few mosquito larvae. Harvest your container weekly to preclude the larvae from turning into flying pests. Your fish will go wild when fed mosquito larvae.
Ants
They make a wonderful snack for larger fish, especially small black ants.
Equipment
A 1-quart container and a paintbrush.
Level of effort
Easy. Look under rocks and logs for ant colonies. I prefer the smaller black ant species. Hopefully, you will find ants carrying their eggs. Take a clean paintbrush and gently whisk as many ants as you need into a 1-quart plastic container. Take care to avoid damaging the ant nest and never take more than you need. Shake them into your aquarium to feed larger fish. Ants are climbers so only introduce a few at a time.
Houseflies
Though normally considered annoying pests, they can make good fish food.
Equipment
A solid color (not see-through) soda cup with a clear lid, an ice chest with ice, watermelon, meat and scissors.
Level of effort
Easy. Few things attract houseflies better than watermelon and a piece of meat. Take a plastic soda cup and place a big chunk of watermelon along with a piece of fresh meat in the cup. Leave the cup outside on a warm day and within a few minutes watch the flies swarm. Slowly approach the cup, and with lightning speed cap it with a clear lid. Chill the cup down to about 40 degrees in the ice cooler to slow the flies’ movement. Look through the clear lid to monitor the reduction of movement. Remove one fly at a time, clip off one wing and feed your fish. Wash well after working with flies since they can carry disease.
Pond snails
When crushed, they make a nice treat for carnivorous fish.
Equipment
Tweezers, an aquarium or nearby pond for snails, aquarium net, scissors and a plastic cup.
Level of effort
Easy. If you are lucky enough to have a snail-free aquarium, you will need to collect some from a pond or ask another aquarist for a few. Pond collection is easy. Look at shoreline vegetation and algae clumps for snails. Take only what you need. Most fish can’t break through the tough shell so a little help is necessary. If using your fingers is not an option, try tweezers. Remove any uneaten snails to avoid fouling your aquarium water.
Mealworms
These creatures are actually insects rather than worms. Mealworms are a wonderful food that require absolutely no effort to culture. They are the “plug-and-play” of fresh fish food. The worm is actually a larva, which morphs into a white pupae and ultimately turns into a black beetle. Newly hatched larvae are ideal for smaller fish, while larger larvae are well-suited for bigger fish, reptiles and birds.
Equipment
A 1-quart plastic tub, wheat germ, cracked flaxseed, carrots, potato and starter culture.
Level of effort
Easy. It is almost unbelievable how easy mealworms are to propagate. Obtain a starter culture of six to 10 worms from another aquarist or purchase some at a pet shop. Take 1/2 cup of cracked flaxseed and ½ cup of wheat germ, mix them and add to the 1-quart plastic tub. Place a piece of carrot and a 1/8-thick slice of potato in the container and then add your starter culture.
Put a screen cover on the tub and keep the culture out of sunlight, preferably in a dim area. Keep your culture at 80 degrees and watch the worms (larvae) first morph into white pupa then black beetles. The beetles lay eggs and start the cycle again.
A few weeks following the beetle stage, take a magnifying glass and look for movement and thousands of tiny worms will be visible. These newly hatched larvae will grow to a length of about 1½ inches over a period of many weeks.
White worms
These worms grow to about 3/4 to 1 inch in length and are eagerly accepted by fish.
Equipment
A 1-foot by 8-inch-wide plastic storage box with perforated (small holes) cover, spray mister, tweezers, fine-mesh fishnet, compost, sterilized potting soil, wheat germ, instant potatoes and a starter culture.
Level of effort
Easy. Fill the container about half full of potting soil and compost mixture. Gently kneed in about a ½ cup of moistened wheat germ and instant potatoes. Add the starter culture of worms and cover it. Make sure to place the box in a dim area that is in the very low 60 degree temperature range.
Check your culture to ensure it does not dry out. I have not tried this, but I’ve read putting a sheet of wax paper over the culture helps retain moisture. Use a spray mister to keep the culture moist. Use tweezers to harvest your culture. Another method is to scoop a cupful of culture soil and place it into a fine-mesh fishnet and rinse under water.
Earthworms
They are found just about everywhere, especially after it rains. They make a fantastic food and are eagerly accepted by fish.
Equipment
A plastic cup half filled with sterilized potting soil, scissors and tweezers.
Level of effort
Easy. Absolutely avoid areas that have been treated with pesticides or herbicides. That usually means you should stay away from the soil in manicured lawns. Look in wooded areas or in meadows after an extended rain. Follow the cultivation techniques described above for white worms.
I don’t culture earthworms. I prefer instead to seasonally collect them. Usually they need to be cut into small pieces because most tropical fish cannot eat such a large object. For those of us who are squeamish, place the worm in a freezer for a few minutes and then snip it into small pieces. It is unlikely there will be any uneaten portions, but if there are remove them in a timely manner.
Crickets
These insects can be purchased at just about any pet or bait shop and make a great component to a well-rounded diet. They can also be collected in the wild.
Equipment
You will need a cricket cage (for temporary holding), a large collection net (1-foot opening), vitamin and mineral gel cricket food, 20-gallon tall aquarium (to prevent escapes), under-cage reptile heater, tight-fitting fine-mesh top, plant potting mix (unfertilized), ceramic coffee cup dish, cardboard egg carton, fresh fruit and lettuce.
Level of effort
Easy. Take a walk in a meadow and look for crickets on the stalks of grasses and other vegetation. Capture only what you can use in a day or two. Keep your cricket cage in a dim area of your garage. If you chose to propagate crickets, do it in your garage or outside during warm months to preclude escapees from driving you nuts at night with non-stop chirping.
Install the under-tank heater and put the 20-gallon tank on a stand. Keep the tank temperature at about 85 degrees. Add about 2 inches of plant potting mix and place the coffee dish in a corner. Place about 10 gel food cubes in the dish. Keep the gel food fresh and also provide small chunks of fruit and lettuce. Add a starter culture of about 24 crickets, wait about one week then remove the adult crickets and use them for feed.
By week two, you will start to see small newly hatched crickets called “pinheads” that are about 1/8 of an inch in size. Take cardboard egg carton sections and place them in the tank. The crickets will climb on to the cardboard making capture a cinch. Shake the cardboard over your aquarium to feed your fish.
Feeder fish
“Feeder” is a generic name for any smaller fish that is fed to a larger fish. Pet stores sell goldfish and other inexpensive fish for this purpose. But use caution when purchasing feeder fish. Luckily, most suppliers and breeders take extraordinary steps to deliver disease-free, healthy feeder fish.
Some retail outlets sell diseased fish because they pack thousands of feeder fish into disgustingly filthy tanks. Try to see if you can get your fish to accept alternative foods before investing time and energy into using feeder fish.
Equipment
A well-established 10-gallon quarantine aquarium and feeder fish.
Level of effort
Easy. Locate a good pet store that maintains feeder fish in clean conditions, and always quarantine feeder fish for two weeks prior to introduction as a food. An alternative to purchasing feeder fish is to propagate them yourself. I use two methods depending upon my needs.
For tanks with smaller tropical fish, simply introduce guppies. Four female and two male guppies will provide a constant stream of offspring. If you keep larger fish like cichlid fish, you will need to raise your feeders in a separate tank. Use a 10-gallon, well-planted tank for propagating guppies.
Other Options
There are several alternatives for hobbyists who are unable to propagate their own fresh live foods. Many pet stores sell mealworms, crickets, newly hatched brine shrimp and other live foods. Frozen foods provide another excellent choice. Most pet stores carry some frozen foods.
A tremendous source of frozen foods is via mail order. Check the pages of this issue of FAMA for advertisers carrying frozen foods. Another source of fresh foods is your kitchen. I feed our turtles and some fish basically what we eat. Uncooked fruits, vegetables and fat-free meats are superb fresh foods. Just chop them up to the appropriate size.
The benefits of supplementing a flake food diet with fresh and frozen foods are significant. Your fish will look prettier, grow faster and probably live longer. As aquarists, we tend to concentrate on water quality and general environmental conditions, yet we sometimes overlook the need to provide our fish with a balanced diet. By feeding them fresh foods, you will fix that lousy room service problem, and your guests will never want to check out!
Posted By: Chewy Editorial
Share:
